Below is a recommended workflow when committing multiple related patches into Gerrit. This workflow is based on some extensive collaboration with Robert Read.
Initial Push into Gerrit
- Create a commit plan. If you're making a lot of changes to the code, decide how you plan to break these changes into patches.
- Create your working branch off of master
- git checkout -b <working branch>
- Make the changes according to your plan, and as you finish each patch commit into your working branch.
- git add <files>
- git commit -av
- Follow the guidelines for comments, etc, as already documented.
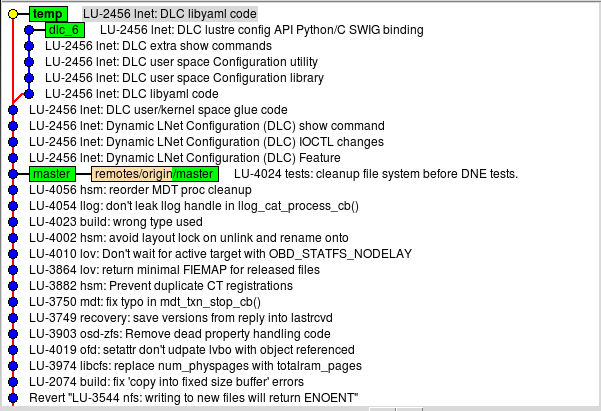
- After you're done all your patches, you'll have a git repo that looks something like the following. The example used is from the DLC project.

- You'll notice that there are nine commits on the branch dlc_6, which is based off master
- Make sure that every patch by itself can be compiled, run and pass autotest (although you won't know the latter until you push into gerrit, unless you're able to run the autotest on your local machines)
- Now you can push into gerrit.
- git push ssh://<username>@review.whamcloud.com:29418/fs/lustre-release HEAD:refs/for/master
- Gerrit will recognize each individual commit and create a review page for each commit.
Addressing Inspection Comments
Now that you submitted your code into gerrit, you'll most likely start getting comments on the different patches. You'll need to update the separate patches and probably rebase all the patches which depend on the patch you have changed. Below is a work flow to aid you in this process.
- Create a branch off the commit that you want to change
- git checkout -b <temporary branch> <commit-id>
- Now that you're on the <temporary branch>, start addressing the inspection comments
- git status
- Will show the changes you've made
- Now commit and rebase your changes on that temporary branch, so you don't have multiple commits.
- git add <files>
- git commit --amend -av
- Follow the guidelines for the commit message
- This will commit and merge your changes with the original commit
- Alternatively, a more manual way of achieving the "git commit --amend -av" is as following
- git commit -av
- git rebase -i HEAD~2
- This will show you the previous commit and the your recent commit to address the inspection comment
- Change the commit for the inspection changes from "pick" to "fixup"
- This will collapse the inspection commit into the original commit
- Compile and make sure your fixes are good.
- At this point the git repo will have the temp branch. Using the same example above, I needed to edit the commit: LU-2456 lnet: DLC libyaml code. So I created a branch based on that commit, made the changes and committed on the temp branch. Notice that now the same commit exist on both the temp and dlc_6 (working) branch. The one on the temp branch is the modified one. Next step is to pull that into the dlc_6 branch.
- At this point the git repo will have the temp branch. Using the same example above, I needed to edit the commit: LU-2456 lnet: DLC libyaml code. So I created a branch based on that commit, made the changes and committed on the temp branch. Notice that now the same commit exist on both the temp and dlc_6 (working) branch. The one on the temp branch is the modified one. Next step is to pull that into the dlc_6 branch.
- Rebase your changes from the <temporary branch> back into your main working branch
- git rebase -i <temporary branch> <working branch>
- delete the redundant commit that you're pulling in from your temporary branch
- basically this step is saying, I don't want to use the commit that currently exists on my working branch, I want to replace it with the commit from my temporary branch, which I have made some changes to.
- Note that the order git displays the commit while doing interactive rebase is from oldest to newest. you probably want to keep the same order.
- Continuing from the same example, below is a screen capture of the interactive rebase vi session

- Now you need to delete the first line, so that the rebase uses the modified patch

- basically this step is saying, I don't want to use the commit that currently exists on my working branch, I want to replace it with the commit from my temporary branch, which I have made some changes to.
- After this is complete, all your commits which depend on the change you just made will be rebased on your changes.
- Continuing the same example, below is a screen capture of what the git repo looks like
- Continuing the same example, below is a screen capture of what the git repo looks like
- Now that you're on your working branch, delete your temporary branch
- git branch -d <temporary branch>
- Continuing the same example, below is a screen capture of what the git repo looks like. Note, it looks exactly the same as what you started with
- Continuing the same example, below is a screen capture of what the git repo looks like. Note, it looks exactly the same as what you started with
- git branch -d <temporary branch>
- From your working branch push into Gerrit
- git push ssh://<username>@review.whamcloud.com:29418/fs/lustre-release HEAD:refs/for/master
- Gerrit will recognize which patches has changed and update them appropriately.
- Now you're ready for more inspection comments. This process can be repeated until the patches pass inspection.


Rebasing On Master
As work on the working branch goes on, there will come a time when we need to rebase on the latest and greatest.
- On the master branch do:
- git pull
- On the working branch do:
- git rebase master (you can use -i option if you want to edit the list of changes)
Sometimes you might have multiple commits on your working branch. Each commit gets pushed into gerrit as a separate review. When synchronizing with the tip of the remote repo, you'd want to rebase each of the commits. I do so in the following steps:
- checkout the earliest commit into its separate temporary branch
- git checkout -b <temp branch> <commit-id>
- go to master and update it to the tip of the remote repo as shown above (using 'git pull')
- rebase the temp branch to master. On the temp branch do
- git rebase master (you can use -i option if you want to edit the list of changes)
- rebase the temp branch on your working branch (as shown above).
- git rebase -i <temp branch> <working branch>
- ensure to remove the commit of the temp branch from the commit list displayed by rebase.
- git rebase -i <temp branch> <working branch>
Overview
Content Tools
1 Comment
Christopher Morrone
You keep listing both "git add" and "git commit" with the "-a" option. If you are using "git add" you shouldn't need commit's "-a" option. Oh...maybe you are thinking that git add is only for new files? "git add" stages changes. You use it for any changes you want to stage, not just completely new files.