Currently there is no dedicated functional test tool in Lustre test suites for LNet testing. Lustre Unit Test Framework (LUTF) fills that gap to provide a means for testing existing LNet features as well as new features that would be added in future. It facilitates an easy way of adding new test cases/scripts to test any new LNet feature.
This High Level Design Document describes the current LUTF design, code base, infrastructure requirements for its setup and the new features that can be added on top of the current design.
Document Link |
|---|
| LNet Unit Test Infrastructure (LUTF) Requirements |
This document is made up of the following sections:
The LUTF is designed with a Master-Agent approach to test LNet. The Master and Agent LUTF instance uses a telnet python module to communicate with each other and more than one Agent can communicate with single Master instance at the same time. The Master instance controls the execution of the python test scripts to test LNet on Agent instances. It collects the results of all the tests run on Agents and write them to a YAML file. It also controls the synchronization mechanism between test-scripts running on different Agents.
The below diagram shows how LUTF interacts with LNet
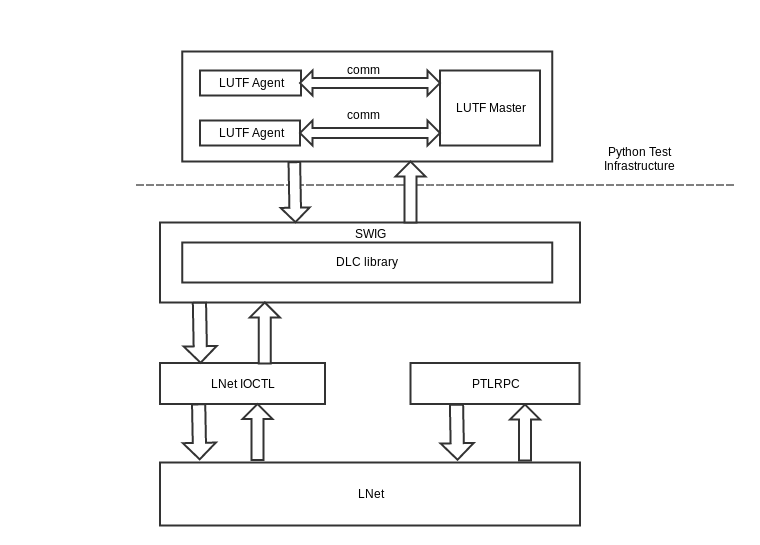
Figure 1: System Level Diagram
The LUTF shall be integrated with the Lustre tests under lustre/tests/lutf. The LUTF will be built and packaged with the standard
sh ./autogen.sh ./configure --with-linux=<kernel path> make # optionally make rpms # optionally make install |
The make system will build the following items:
lutf binaryliblutf_agent.so - shared library to communicate with the LUTF backend.clutf_agen.py and _clutf_agent.so: glue code that allows python to call functions in liblutf_agent.solnetconfig.py and _lnetconfig.so
The build process will check if python 2.7.5 and SWIG 2.0 or higher is installed before building. If these requirements are not met the LUTF will not be built
If the LUTF is built it will be packaged in the lustre-tests rpm and installed in /usr/lib64/lustre/tests/lutf.
Each node which will run the LUTF will need to have the following installed
yum install ncurses-devel
yum install readline-devel
https://www.python.org/download/releases/2.7.5/
./configure --prefix=<> --enable-shared # it is recommended to install in standard system path
make; make install
python2.7 setup.py install
python2.7 setup.py installThe LUTF will also require that passwordless ssh is setup for all the nodes which run the LUTF. This task will fall on the admin.
The LUTF will provide a deployment script, lutf_deploy.py, which will download and install all the necessary elements defined above.
The LUTF will provide a start script, lutf_launch.py, which will start the master and agent nodes given the appropriate configuration files, described later in this document.
A similar script to auster will be provided by the LUTF, lutf_perform_test.py. The purpose of the script is to manage which nodes the LUTF will be deployed on. Only the AT has knowledge of the nodes available; therefore the script will perform the following steps;
lutf_perform_test.py script. The second option will be assumed in this HLD.lutf_deploy.py script for each of the nodes provided.lutf_launch.py script for each of the nodes provided. Pass the Master YAML LUTF Configuration file to the master node that the agent configuration file to the agent nodes.paramiko. The API is described below.This file is passed to the lutf_perform_test.py. It describes the test system so that the LUTF can be deployed correctly.
config:
    type: test-setup
	master: <ip of master>
	agent:
		0: <ip of 1st agent>
		1: <ip of 2nd agent>
		...
		N: <ip of Nth agent>
    master_cfg: <path to master config file>
	agent_cfg: <path to agent config file>
	test_cfg: <path to test config file>
result_dir: <path to the directory to store the test results in> |
This configuration file describes the information the master needs in order to start
config:
   type: master
   mport: <OPTIONAL: master port. Default: 8494>
   dport: <master daemon port. Used to communicate with master>
   base_path: <OPTIONAL: base path to the LUTF directory.
               Default: /usr/lib64/lustre/tests>
extra_py: <OPTIONAL: extra python paths> |
This configuration file describes the information the agent needs in order to start
config: type: agent maddress: <master address> mport: <OPTIONAL: master port. Default: 8094> dport: <OPTIONAL: agent daemon port> base_path: <OPTIONAL: base path to the LUTF directory Default: /usr/lib64/lustre/tests> extra_py: <extra python paths> |
The agent's maddress can be inserted automatically, since it's already defined in the setup configuration file.
Both the Master and Agent configuration files can be optional. If nothing is provided all the parameters will be defaulted. In the absence of an agent configuration file one will be automatically created that only has the maddress field. Example below:
config: type: agent maddress: <master address as provided in the setup file> |
This configuration file describes the list of tests to run
config:
   type: tests
   testsID: <test id>
   tests:
        0: <test set name>
        1: <test set name>
        2: <test set name>
        ....
        N: <test set name>

# "test set name" is the name of the directory under lutf/python/tests
# which includes the tests to be run. For example: dlc, multi-rail, etc |
This YAML result file describes the results of the tests that were requested to run (TODO: it's not clear exactly what the result file will look like. What definitely will be needed is the results zip file generated by the LUTF master. This will need to be available from Maloo to be able to understand which tests failed, and why)
TestGroup:
    test_group: review-ldiskfs
    testhost: trevis-13vm5
    submission: Mon May  8 15:54:41 UTC 2017
    user_name: root
autotest_result_group_id: 5e11dc5b-7dd7-48a1-b4a3-74a333acd912
test_sequence: 1
test_index: 10
session_group_id: cfeff6b3-60fc-438a-88ef-68e65a08694f
enforcing: true
triggering_build_number: 45090
triggering_job_name: lustre-reviews
total_enforcing_sessions: 5
code_review:
 type: Gerrit
 url: review.whamcloud.com
 project: fs/lustre-release
 branch: multi-rail
 identifiers:
 - id: 3fbd25eb0fe90e4f34e36bad006c73d756ef8499
issue_tracker:
 type: Jira
 url: jira.hpdd.intel.com
 identifiers:
 - id: LU-9119
Tests:
- name: dlc
        description: lutf dlc
        submission: Mon May  8 15:54:43 UTC 2017
        report_version: 2
        result_path: lustre-release/lustre/tests/lutf/python/tests/
        SubTests:
        - name: test_01
          status: PASS
          duration: 2
          return_code: 0
          error:
        - name: test_02
          status: PASS
          duration: 2
          return_code: 0
          error:
        duration: 5
        status: PASS
-  name: multi-rail
        description: lutf multi-rail
        submission: Mon May  8 15:59:43 UTC 2017
        report_version: 2
        result_path: lustre-release/lustre/tests/lutf/python/tests/
        SubTests:
        - name: test_01
            status: PASS
            duration: 2
            return_code: 0
            error:
        - name: test_02
            status: PASS
            duration: 2
            return_code: 0
            error:
        duration: 5
status: PASS |
There are two ways to start the LUTF Master.
In either of these modes the Master instance can process the following requests:
A C API SWIG wrapped to allow it to be called from python will be provided. The API will send messages to the identified LUTF Master instance to perform the above tasks, and then wait indefinitely until the request completes.
typedef enum {
	EN_MSG_TYPE_HB = 0,
	EN_MSG_TYPE_QUERY_STATUS,
	EN_MSG_TYPE_RUN_TESTS,
	EN_MSG_TYPE_COLLECT_RESULTS,
	EN_MSG_TYPE_YAML_INFO,
	EN_MSG_TYPE_MAX
} lutf_msg_type_t;


typedef struct lutf_message_hdr_s {
	lutf_msg_type_t type;
	unsigned int len;
	struct in_addr ip;
	unsigned int version;
} lutf_message_hdr_t; |
For each of the three requests identified above, the LUTF Master will respond with a YAML block. The python script can use the python YAML parser to extract relevant information.
master_response:
	status: <[Success | Failure]>
    agents:
		- name: <agent name>
		  ip: <agent ip address>
		- name: <agent name>
		  ip: <agent ip address>
test_results: <path to zipped results> |
The LUTF test scripts will need to be implemented in a generic way. Which means that each test scripts which requires the use of interfaces, will need to discover the interfaces available to it on the node. If there are sufficient number of interfaces of the correct type, then the test can continue otherwise the test will be skipped and reported as such in the final result.
Some Sample files from Auster
| A sample Config file used by Auster | A sample result YAML file from Auster |
|---|---|
| results.yml |
Another proposal to passing information to the LUTF if it can not be passed via a YAML config file as described above.
#!/bin/bash #Key Exports export master_HOST=onyx-15vm1 export agent1_HOST=onyx-16vm1 export agent2_HOST=onyx-17vm1 export agent3_HOST=onyx-18vm1 export AGENTCOUNT=3 VERBOSE=true # ports for LUTF Telnet connection export MASTER_PORT=8494 export AGENT_PORT=8094 # script and result paths script_DIR=$LUSTRE/tests/lutf/python/test/dlc/ output_DIR=$LUSTRE/tests/lutf/python/tests/ |