
Introduction
Currently there is no dedicated test tool in Lustre test suites for LNet testing. Lustre Unit Test Framework (LUTF) fills that gap to provide a means for testing existing LNet features as well as new features that would be added in future. It facilitates an easy way of adding new test cases/scripts to test any new LNet feature.
Objectives
This High Level Design Document describes the current LUTF design, code base, infrastructure requirements for its setup and the new features that can be added on top of the current design.
Reference Documents
Document Structure
This document is made up of the following sections:
- Design Overview
- Building the LUTF
- LUTF-Autotest Integration
- Infrastructure
LUTF Design Overview
The LUTF is designed with a Master-Agent approach to test LNet. The Master and Agent LUTF instance uses a telnet python module to communicate with each other and more than one Agent can communicate with single Master instance at the same time. The Master instance controls the execution of the python test scripts to test LNet on Agent instances. It collects the results of all the tests run on Agents and write them to a YAML file. It also controls the synchronization mechanism between test-scripts running on different Agents.
The below diagram shows how LUTF interacts with LNet
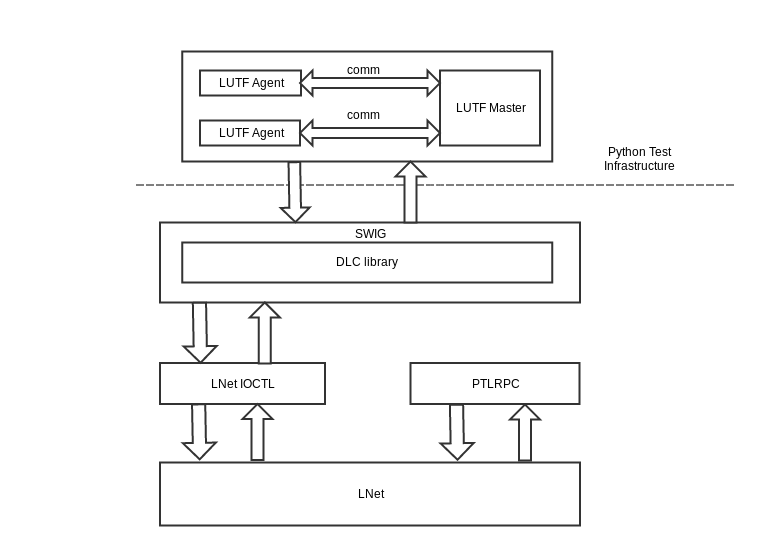
Figure 1: System Level Diagram
Building the LUTF
To build LUTF, it first requires to set up an environment with all the required packages installed and then building using GNU build system like Lustre tree is built.
Following sub sections briefs on the steps for the building process.
Environment Set-Up
- Python 2.7.5 is required along with some other python related packages like -
- netifaces
- PyYAML
- paramiko (some MR test scripts are written using paramiko, so need to have this installed too)
- SWIG (Simplified Wrapper and Interface Generator) is required to generate a glue code to allow the python test scripts call DLC APIs.
- Password less SSH - Nodes running LUTF are required to setup password less SSH to each other.
Build along Lustre tree using GNU tools
- All the other test suites/scripts for lustre are placed under lustre/tests/ directory. Place LUTF as well under lustre/tests.
- Mention LUTF as a subdirectory to be build in lustre/tests/Makefile.am
- * Create an autoMakefile.am under lustre/tests/ and also under lustre/tests/lutf/ .
- Create a Makefile.am under lustre/tests/lutf/ to generate the required binary files and swig files. (This step might further require to modify configure.ac under lustre tree parent directory to add python path and other things).
- Run "make distclean" to clean up any residual build artifacts.
- cd to lustre tree parent directory and run "sh autogen.sh"
- Run "./configure"
- Run "make"
LUTF/AT Integration
For LUTF-Autotest integration, the first step in this process is to build LUTF along with lustre just like other test-suites are build. The previous step "Build along Lustre tree using GNU tools" discussed fulfills this purpose.
Infrastructure
Automatic Deployment
With LUTF-Autotest integration, an infrastructure is created that makes AT to deploy LUTF on the test nodes, collect results of the tests run and then pass the test results to Maloo to be displayed there.
Deploy LUTF
- A config file (similar to what Auster has) is created which can define environment variables needed. This config file is then used by AT to set these environment variables. This file would also have information like IP addresses of the nodes involved in test-suite.
- A Master script is created which can read the IP addresses of the nodes involved in the test-suite from the config file and run LUTF on the identified Agent and Master nodes.
Collect Results
- A YAML format is decided for the results of the entire test-run and a result YAML file is generated per that format.
- The YAML file also points to the path where the test result file for each test is.
- This YAML file is then passed to AT which further passes it to Maloo.
Maloo
- A separate section is to be created in Maloo to display LUTF test results.
- The results from output YAML file passed from AT are displayed in the LUTF results section.
- A Test-parameter specifically for LUTF tests to be defined that will allow to run only LUTF tests. This will help in avoiding unnecessary tests to run for only LNet related changes.
C Backend
This allows for the setup of TCP connection (TCP sockets) to connect the Master and Agent nodes (lutf.c). LUTF can be run on a node in either Master mode or an Agent mode.
Master mode:
Spawns a listener thread (lutf_listener_main) to listen to Agent connections (lutf.c).
- Maintains a list of the Agents, check on the health of Agents, associate and disassociate with Agents (liblutf_agent.c).
- Start up a python interpreter (lutf_python.c).
Agent mode:
- Spawns a heart beat thread (lutf_heartbeat_main) to send a heart beat to master every 2 seconds. The master uses this Heart beat signal to determine the aliveness of the agents (lutf.c).
- Start up a python interpreter (lutf_python.c).
Python
Script execution and result collection
- A telnet connection is established from Master to Agent when we create a Script instance by running lutf_script.Script('local_intf', 'script_path ', 'output_dir') (lutf_script.py).
- The scripts from 'script_path' in lutf_script.Script('local_intf', 'script_path ', 'output_dir') are copied over to Agent using scp (lutf_agent_ctrl.py).
- The copied scripts are then executed by calling run_script() on the Script instance created. (lutf_agent_ctrl.py).
- If an 'output_dir' path is specified then the results of the script execution are copied to the path given by calling push_results(). If no path is provided for the 'output_dir' then the results are ignored.
Batch test
how should we execute a collection of tests. You can discuss how it's currently done, and if it can be imporved.