How to launch
EXAScaler Cloud application can be launched on Microsofts Azure platform by navigating to the link below and selecting GET IT NOW
Step by step video
Step by step guide
The steps below will show how to create a EXAScaler Cloud Cluster on Microsoft Azure platform.
You will need an Azure account. Sign in.
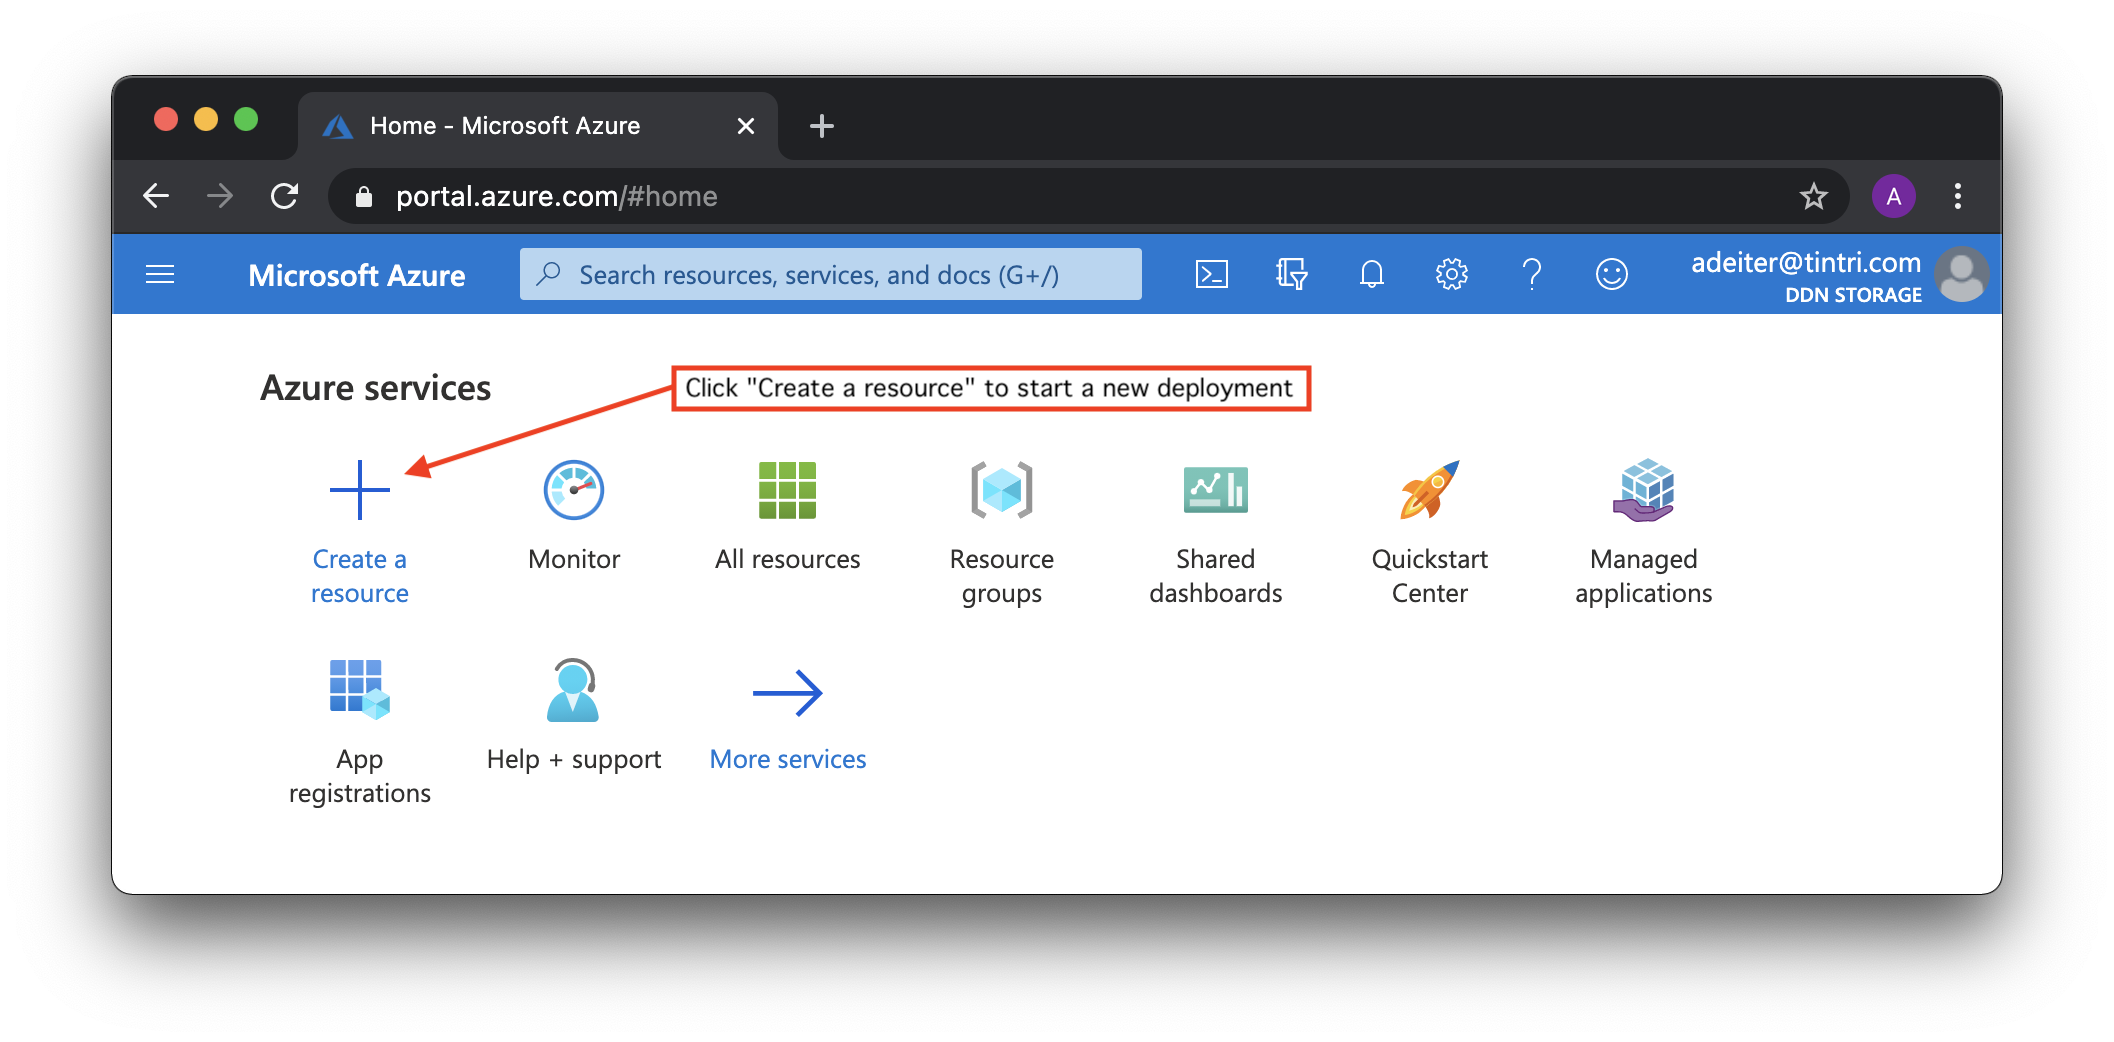
Login to your account and go to the dashboard.
You can get to the dashboard from anywhere by clicking on the blue "Microsoft Azure" in the upper left corner of the GUI.
To get started click on "Create a resource" to get ready to start deployments of a new instance of EXAScaler Cloud:
In the search box that appears, type "EXAScaler Cloud" and hit return. For some reason the completions that start to show up do not work as expected:

Click "Create" button:

EXAScaler Cloud environment can be deployed as a standard Azure application using the Azure Marketplace. And the installation wizard is used to deploy it. Installation wizard contains few configuration steps:
Basic step contains Project details:
- Subscription - because all resources in an Azure subscription are billed together. And we need select one from list of available subscriptions.
- Resource group - is a collection of resources that share the same lifecycle, permissions, and policies. And we can select an existing resource group or create a new one to deploy an EXAScaler Cloud environment.
Instance details:
- Azure region for our deployment. For example, we can select the location closest to us. And we must have enough resources in this location for the deployment (number of available CPU cores).
- Configuration Profile: we can choose predefined configuration profile or create a custom EXAScaler Cloud configuration. We provides two predefined profiles:
- Small profile that will configure Microsoft Azure resources to deliver 10TB capacity and 1.44 GB/s throughput performance.
- Medium profile that will configure Microsoft Azure resources to deliver 50TB capacity and 6 GB/s throughput performance.
- Custom profile, that allows us to deploy any environment according to our requirements.
DDN EXAScaler Cloud pricing is based on the number of CPU cores configured to meet the defined performance requirements. And DDN Premium Support is recommended for Custom profile. - Filesystem name that will be mounted from clients as a distributed network resource.

Security step required to select user name and authentication parameters to remote access to the management server. And Microsoft Azure provides two options for
authentication: password and SSH key-based authentication:

Network step to configure Azure Virtual Network which enables resources to securely communicate with each other. And the subnet inside the virtual network where EXAScaler Cloud virtual machines will be deployed to.
We can create a new virtual network for deployment or we can use an existing network, for example, if we already have an environment with clients that need a HPC storage:

Management step to configure EXAScaler Cloud management server. For the Custom Configuration profile we can choose:
- Size of management server
- Type and size of management target
- Type and size of monitoring target
For Small and Medium Configuration profiles all configuration options are read-only:

Metadata step to configure EXAScaler Cloud management server. For the Custom Configuration profile we can choose:
- Size of metadata server
- Type and size of metadata target
For Small and Medium Configuration profiles all configuration options are read-only:

Storage step to configure EXAScaler Cloud object storage servers. For the Custom Configuration profile we can choose:
- Size of storage server
- Number of storage servers
- Type, size and count of storage targets
For Small and Medium Configuration profiles all configuration options are read-only:

Client step: optionally we can deploy client instances and by default the size and number of client instances matches the size and number of object storage servers. As an option we can create and attach local disks to each EXAScaler Cloud client. We can change:
- Size of storage client
- Number of storage clients
- Type, size and count of storage targets
And all storage client options can be changed for any Configuration profile:

Review + create step: at this stage Microsoft Azure checks all selected options against the subscription quota. And we can review and check all the parameters we have chosen before starting the deployment:
- Subscription
- Resource group
- Region
- Configuration profile
- Filesystem name
- User name and authentication parameters
- Network properties
- Management server options
- Metadata server options
- Storage server(s) options
- Storage client(s) options
And we can press a "Create" button and send the selected configuration for deployment.
Next you will see the dashboard notification with "Deployment is in progress":

Once the status changes to "Your deployment is complete", click on "Outputs" to view the deployment output:

In the "Outputs" screen:

command to remote access
to mount EXAScaler distributed file system. All storage clients created in this deployment should mount this filesystem
- EXAScaler Cloud Private IP Addresses
Copy and paste the "" URL on a new browser tab to view EXAScaler Cloud Web Console:
To access the EXAScaler Cloud servers (management, metadata, object storage and storage clients), we must go through the management server public IP address:
TODO
Overview
Content Tools