Page History
...
To get started click on "NewCreate a resource" to get ready to start deployments of a new instance of Lustre


In the search box that appears, type "lustre" and hit return. For some reason the completions that start to show up do not work as expected


choose the version ending in "GS" and choose "create". This will open the GUI to fill out the Lustre template.

"Lustre on Azure" in Compute category.

click "Create"

In the "Basics" In the screen that appears you will fill out the fields in the template.
Lustre Prefix Name Filesystem name - this will be name of your lustre filesystem and also prepended to the names of the lustre VM oVM hosts. For example here it is specified as ldemo so our MGS node will be ldemomgs.
Admin Username - This is the username for the administor account. Here it is left at the default "azureuser".
Password Type Authentication type - You can choose to use a password or a key. You can cut and paste a public key here. For windows you can load your private key into puttygen and cut and paste the openssh version of the public key into the box. Whatever you do here will be propagated to all the VMs in the Lustre Cluster.
Resource Group - Is the unique name for your group of resources (the resources that make up your Lustre cluster). You can create a new resource group or use existing one (must be empty)
Location - Choose the Azure region you would like to deploy to from the drop down list.

When done hit "OK" to move to the next screen.

In the "Lustre Network Settings", fill out the fill in the template
Lustre virtual network - this is the virtual network that the VM will be using. You can create new or use existing one.
Lustre Subnets - this is the subnet that VM will be using. A new one will be created in case of new virtual network.
Public IP address name for MGS - This is the resource name for the public IP address. Not the hostname of the MGS which is what you will ssh into.
You can let it create a new one or use existing one. If you choose "None", you might not be able to ssh in your cluster.
DNS Prefix for public IP Address Domain name Label - This is the hostname of the public MGS node. Note that underneath the box is the rest of the public address.
Next click on th MGS VM Size to select the VM type for the MGS node.

When done with "Lustre Subnets", hit "OK" to go back to "Lustre Network Settings", hit "OK" again to move to the next screen.

in the "Management Server Setting", Here you can choose the type of VM for the Management server (MGS). The current selection is outlined by the blue box. When done hit select in the right pane to chose the MGS and then OK to finish the MGS selection.

Next we will fill out the infomation for creating our Meta-Data server (MDS)
Fill out the name you would like for the Lustre filesytem and like the MGS choose the type of VM you would like to use.

click "Change size" if you want to choose a different size
When done, hit "OK" to move to the next screen

In the "Metadata Server Settings", you can choose the type of VM for Metadata server (MDS)
Click "Change size" if you want to choose a different size
Click the drop down menu for "Size of each MDT disk" if you want to change the Metadata Target size (MDT). default is set to 512GB.
Note: MDT is not the VM boot disk. It is Lustre Metadata disk
When done, hit "OK" to move to the next screen

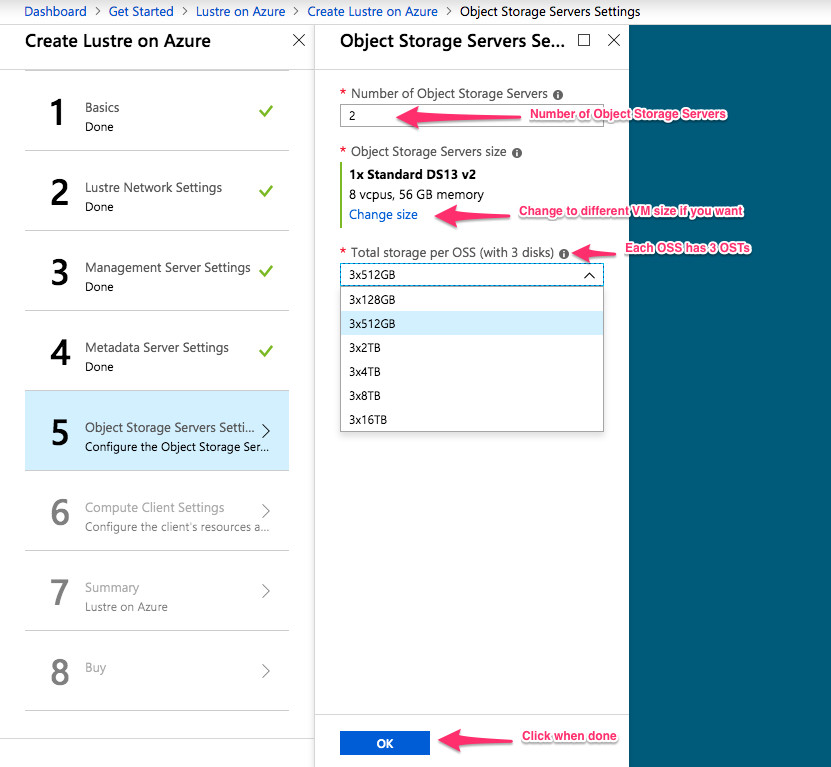
In the "Object Storage Servers Settings",
First enter First chose the number of Object Storage Servers (OSS) you would like to use from the drop down list.. Default is 2
Then select the type of VM for Object Storage server (OSS)
Click "Change size" if you want to choose a different size
Also choose the size of each of the 3 OSTs that will be attached to your OSS
Then select the type of VM for your OSS.

The next section is used to setup the storage class and the networking.
First give you storage account a name.
Then chose the durability and High Availablity features for your storage. See the section "Replication for Durability and High Availability" at https://azure.microsoft.com/en-us/documentation/articles/storage-introduction/ for an explanation of the different selections shown here.

Next to setup is the network that the lustre servers and clients will use. You can use an existing network if you have one. In the case we don't so we create a new one.
We give it a name and pick an /16 address range to use.

Next we setup the subnets, one for the server and one for the clients.
Name the subnets. You can also change the address ranges, but they need to be in the /16 range you specified above.

When done, hit "OK" to move to the next screen.
In the "Compute Client Settings", client lustre image is free of charge. You only pay for VM.
First enter number of compute client. Default is 2.
Click "Change size" if you want to choose a different size
When done, hit "OK" to move to the next screen.

In the "Summary" screen, a After section the OKs in the previous window, a summary of what has been entered is shown in the summary.

Verify information you have entered and click "OK' when done

Read the terms of use and purchase your Lustre Filesystem.

Enter name, email adress and phone number
when done click "Create"

Next you will see the dashboard with a spinning "deploying". It will take awhile. Occassionally it will notrefresh when it is done, so check on it occasionally by refreshing the page.

When it is done chose "resource groups" in the left pane and then your new resource group that you created.
You should see "succeeded" user "last deployment:
You will also see an "overview" of your resources in the resource group.

notification with deployment in progress...

Click on "Deployment in progress...", you will see the status of your deployment

Once the status changes to "Your deployment is complete"
Click on "Outputs" to view the "lustre Gred Report" (ie ganglia)

In the "Outputs" screen,
mgsNID - this is the private IP address of the MGS
mgsDomainName - this is public hostname for MGS
gangliaURL - this is the URL to view the grid report
mountCommand - this is the command to mount lustre. All compute clients created in this deployment should mount. if not run command 'mount -a' on the client

Copy and paste the "gangliaURL" on a different browser to view grid report

To access the Servers (MGS, MDS, OSS), we must go through MGS public IP
From the deployment complete screen "Overview", click on virtual machine name ending mgs. In this case "ldemomgs"

On MGS VM screen,
Click "Connect" to view info on the right
Choose "SSH", then copy the Login command and paste on to your terminal
 If you choose "deployments" you can see that the process was done in 4 separate deployments, If you chose the first one a summary will appear where you can see the MGS public address to use to SSH to your MGS and the link to the ganglia output that can be used to monitor the activity in your Lustre filesystem. Also shown is the mount command to use on your clients to mount the Lustre Filesystem.
If you need to access the other nodes in the cluster and you have used the key option, you have two options.
The best method is to run a pagent ssh-agent and ssh with forwarding enabled so the MGS node can get the private key from your workstation.
The other less secure way as you make you are exposing your private key would be to copy your private key to the MGS so it can be used to access the other nodes.

following is what the dashboard link will show

To install clients to mount and try out your new filesystem use the template at https://github.com/Azure/azure-quickstart-templates/tree/master/intel-lustre-clients-on-centos
A window will open in your Azure account. Fill in the parameters. The new ones are highlighted in the screenshot below. The other values you can get from your previous deployment of the servers. If you have forgotten the values see the screenshot after the next one.

If you have forgotten any values you can open another window/tab in your browser and go to the "Inputs" section of the server deployment and copy and paste the values into your client template.

If you return to the resource overview you can see the client is deploying. When finished this will show "succeeded".

When it is finished deploying, click on client0 and in the right most pane you can see the public address you can use to ssh to the client. You can get to the other clients from this one.

Similar method can be used to access 'client0' (client0 acts as the gateway to access all compute clients)
Overview
Content Tools